

Creating a Building Using Model Builder Print Outs
This tutorial is a guide to creating chipboard Models with the Evan Designs Model Builder Program.
Make This with Us!
Tools
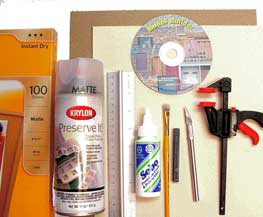
- Model Builder
- Matte Photo Paper
- Krylon Matte Overspray
- Metal Ruler
- Quality White Glue
- Small Paintbrush
- Pastel Chalk
- Sharp Hobby Knife
- Small Clamp
- Chipboard
Chipboard: Chipboard can be found in cereal boxes, or the backing to a pad of writing paper. Chipboard is easy to score and cut with a hobby knife. Chipboard comes in various thickness.
Medium, or .03 inch is a good thickness for most models, the chipboard attached to the back of a paper writing pad is about this thick. Thick chipboard, .05 inch is good for larger models, and for the floor of a building. A single pass of a hobby knife with medium pressure makes a score mark so the chipboard is easily bent.
Metal Ruler: Metal rulers are preferable for use when cutting chipboard or trimming paper
Paper Glue: Use a good quality paper glue such as Sobo (available in Craft stores) or Aileen's Tacky Glue. Spread the glue on the side of the buildings as opposed to putting glue on the paper. Use a small scrap piece of chipboard to get a thin coat of glue. Too much glue can cause your paper to wrinkle!
Photo-Matte Inkjet Paper: Photo matte Inkjet paper is a bit thicker than standard paper and has great print quality to show off the great detail printed from the Model Builder program. You can find Matte Photo paper at some grocery stores, they call it "presentation paper"
PrinterWe always print on an inkjet printer.
One modeling approach we have used on some buildings is to use separate printed output for the walls, doors, windows, and trim. This approach results in a more 3 dimensional appearance, see Figure. Also in this approach specific components that look good printed on a glossy photo paper, such as the doors and windows were added.

Pastel Chalk You may have a seam where the paper ends at the corners of models. The seam is typically white, and can be quite noticeable. A good method of hiding the seam is to rub on a little pastel chalk that is close to the model's brick or siding color. Craft stores have a good selection of pastels. For most models, a tan/brown pastel kit and a gray pastel kit will be adequate.
Small Bar Clamps When you are gluing up the chipboard, adding the floor and gluing on the roof, these come in handy.
Over Spray Fixative Over spray protects the model from smudging and reduces UV light fading. We have found that KRYLON® UV Resistant Clear Acrylic Coating- Matte, or "Preserve-It" work well. Spray a coat on your model when you are done building.
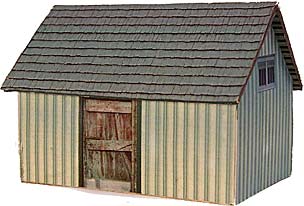
Building your first Model Building -
In the Track Side Shed shown above each side of the model was printed on a single piece of paper. You can print a model with all of the sides printed on a single sheet of paper, as shown in the Service Station. We have found that extra care is needed in this approach to locate windows and doors, and to bend the corners in exactly the right location.
In the Service Station the building walls were chosen from one of the "Cement-Stucco" patterns. A brick pattern was chosen for the foundation. One of the trim patterns was selected for the upper brick trim. The roof was printed with the terra-cotta roof pattern. Small strips of the terra-cotta pattern were used on the ridgelines of the roof. A stone pattern was printed for the building base and glued to thick chipboard. The pillars were made from stucco printed matte photo paper that was folded. Small building components such as these pillars are easier constructed from paper. We cut holes into the based to keep the pillars secure.
The description below guides you through the modeling approach used in the small shed. Build time is estimated at 1 to 2 hours. This is a good building to start with if you have not created a chipboard model before. The service station has more components and takes about 2 to 3 hours to complete.
Step 1 Print the plan in your selected scale
After choosing "Building Plans" from the "Other" Category drop down, select a Model Building Plan from the six available plans, and click on the Design Screen drop the plan and view it.
Since you selected a scale as you entered Model Builder the plan will be ready to use without resizing or adjustment. In larger scales the complete building plan will not fit a single page. You can choose to print the whole plan by going to "File" "Project/Page Setup" and selecting all 4 pages. See more information about moving Building Plans and resizing plans in the Manual
Step 2 Trace the printed building plan onto a stiff material such as chipboard or pulp-board. Cut out your chosen material, and score on the dashed lines. See Figure 1. 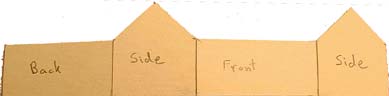
Figure 1
Fold the chipboard at scored corners and tape or glue where the material meets.
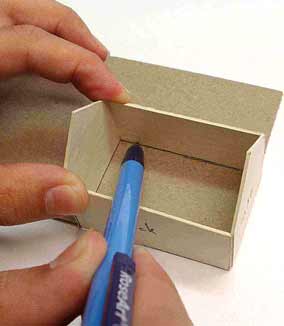
Figure 2
Step 3 Create a bottom for the model out of cardstock To make the bottom, hold the corner of a piece of cardstock below the model. Take a pencil and trace the bottom cardstock from the inside, see figure2
Cut out the bottom and glue it to the inside of the Model, see figure3. The bottom will serve 2 purposes: squaring up the corners and providing rigidity. If you want to access to the inside of your building, cut a hole in the chipboard base first.
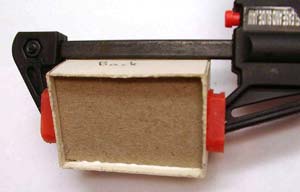
Figure 3
Step 4 Make a Chipboard Roof
The roof for each of the sample model buildings is a rectangular piece of chipboard, scored at the roof ridgeline. Set the roof aside for later assembly.
Step 5 Create and Print Designs for your Model using Model Builder
With the Building Plan Still on the Design Screen, start adding your Building Materials. You can choose to print the Building Plan Superimposed onto the Materials when you are done or Print the Building without the plan on it. See the manual for more information on your choices for working with building plans.
For this tutorial we will be printing each side of the building separately.
a)Add a Background for the building side.
Add a background building material to the screen, choose from siding, bricks, stucco, stone, or wood from the "Materials" Palette and paint or crop the material to a size appropriate for the building side. We like to make our materials a little oversize. It's easy to trim excess material, but hard to add extra material if you fall short!
b) Overlay, size and arrange your items such as Windows, doors, trim, foundation and vents onto your background material. Save your design.
c) Print your design.
d) Repeat steps a), b), and c) for the other 3 building sides, giving each side a unique name.
e) Choose, size, and print your roof material. Some materials such as metal can be used as a single piece to span both sides of the roof. Some roofs look better with a separate roof piece printed for a roof cap. See the small service station figure above.
f) Optional - Add Rafters. Print some rafter material for your roof, (see the rafters on the trackside shed building). This adds a nice detail to your roof, especially if your roof overhangs the front and back of your building by a good amount. We have found that by stretching some of the lattice/grill images and using the crop/paint mode the result is nice roof rafters.
Step 6 Glue your printed design to the chipboard building
There are several approaches to adhering your print output to your chipboard model. The following is the technique we prefer:
Cut the printed building sides oversize, as we will be trimming off extra paper with a hobby knife. You may find it easier to trim the top edge before gluing as the roofline makes it more difficult to trim this area later.
Spread paper glue on one side of the chipboard building using a scrap piece of chipboard. Try to get a nice even thin coat.
Place your printed design onto the glue, check to make sure your design is straight. Allow to dry. Trim the excess paper with a sharp hobby knife, see figure 4. This trimmed edge will meet up with the trimmed edge of the adjacent side to make a 90-degree corner.
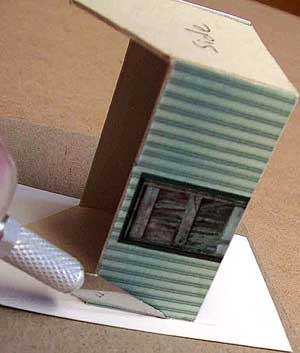
Figure 4
You may see the white edge of the paper at the building corners. This will be fixed in Step 7.
If you are using 1 printed image for both sides of the roof, bend the chipboard roof to an angle a little beyond the angle you need, stick on your roof paper, and hold it in place until dry with a small clamp. If you are gluing on 2 separate pieces of paper, cut the top edges at the top of a shingle row. Bend the chipboard to the desired roof angle before gluing. When gluing slide the 2nd paper side up to the 1st paper side until they meet. For the service station we added a roof ridge cap for added detail. A ridge cap would be more difficult to add to a tighter angled roof.
Step 7 Chalk visible paper edges
At the corners of the building walls and roof ridgelines, the white edges of the paper may be noticeable. These areas can be easily touched up with pastel chalk. Pick a pastel color that is similar to the brick or siding color of your building. Scrape off any coating the chalk may have and rub sparingly across the building corners. See figure 5. For roofs, this may be easier to accomplish after the roof is in place. See step 8. 
Figure 5
Step 8 Fasten the roof
Use glue to fasten the roof to your building and hold the roof in place with small clamps or rubber bands until dry
Step 9 -Optional: Spray Fixative to protect your model from eventual fading.
A Fixative such as Krylon Matte Overspray offers smudge protection, and also protects from eventual fade that inkjet ink can be subject to from UV light.
Now you are ready to install your new building in your layout!


