
Making White text with Hobbycal Decal Paper
Anyone who owns an inkjet printer knows that white text is impossible. Inkjets do not have white cartridges. So how can you get white text on a building, model, or rolling stock??
Start with a white-based decal paper!
Our Hobbycal Decal Paper is matte finish, white based, and made to work with Inkjet inks!
And there is even more good news, you do not need a "fancy program" to make the white text. Here is an example using Microsoft Word, which most people have installed on their computers.
I have opened Microsoft Word to make my white text on a background color
First, on the view menu, select toolbars, then select the drawing toolbar.

Choose an oval or a rectangle shape from the drawing palette. You will be cutting away most of the shape, so the shape you choose will not matter too much.

Now you will want to fill your rectangle with a color as close as possible to your train or model color.
Click on your rectangle to select it if it is not already selected.

On the drawing toolbar, there is a paint can. Next to the paint can is a small down arrow.
Click the arrow, you will see the fill colors. At the bottom of the colors is a button that says "more fill colors..."click that, then click the "custom" tab and you can experiment with the many many color choices.
Make several rectangles and fill each one with a different shade, print them all out at once on plain paper and try them for color against your train.
For this example I chose dark green for my fill color.
Now, I want to add white text to my rectangle.
Again in the drawing toolbar, there is an image of a page with text in it.

Click on this image and then click anywhere inside of your rectangle. Do not draw a box, just start typing your text
Now it's time to make your chosen font. Normally the font menu appears at the top in Word.
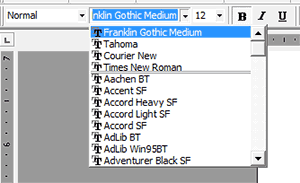
Select the text you just typed by clicking on it, leave your mouse button depressed and drag the mouse to highlight it. Choose any font, make it bold or italic if needed.
Next, choose your font color by clicking the arrow next to the "A"… in the font toolbar.Choose white for the font color.
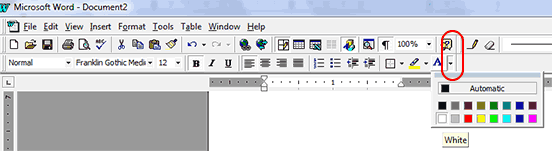
 For my example, I chose Franklin Gothic for the font, Bold, and white for the font color.
Don’t worry if your rectangle is larger than your text, you will be cutting away all of the extra after printing anyway.
If you have a logo image you want to add, choose "insert" from the top toolbar and add your image to the rectangle.
Now you are all set! Print your image onto our Hobbycal Decal paper and cut away as much as possible of the background color. Do not cut between letters because it would be tough to get the letters aligned correctly!