

Videos on How to Wire a Model Switch
How to Wire a Light Switch Model
Learn how to wire a light switch model and types of model switches like slide switches, toggle switches, momentary switches, and more!Video Transcription
This is an easy way to power an LED, the red wire from power goes to the red of the LED, the black wire from power goes to the black of the LED. This circuit doesn’t have a switch, so the only way to turn it on and off is to disconnect the battery.
To make things easier, you can add a switch to the red wire. If you put a switch in here, one end of the switch goes to power and the other end of the switch goes to the LED. In this example we’ve added a switch, you see the power goes to the switch and on out to the LED, the negative from the power goes directly to the LED. Now we can easily turn our LEDs on and off.
There are a lot of different switches, here are just a few of them. There’s the switch that you saw before, there are panel mount switches, there are momentary switches (momentary are only on when you press them) there are toggle switches, slide switches, and reverse momentary switches. All of these switches have 2 red wires.
One end of the switch, doesn’t matter which one, goes to power and the other end of the switch goes to your LEDs. In this demo board, we put all our switches in place, so you can see these three are panel mount so they screw directly onto your panel.
This is the old-style toggle switch, push-button switch. This is a large momentary, it’s on when you press it but off when you let go, this is nice for interactive displays and the nice big size is good for kids.
Then we have our micro switch, slide switch. This switch you notice is on, is called a reverse momentary it’s only off when you hold it down. So this is good if you want to put it inside a book or inside of a box, because the lid of the box or book will hold it down, and when you let off it will come on. This is our very small momentary switch.
There are other types of switches, these switches are “sensor type switches”, by that I mean they need to receive power in order to sense a signal. So when they receive power here, this end goes out to the LEDs and will activate the LED when they receive power.
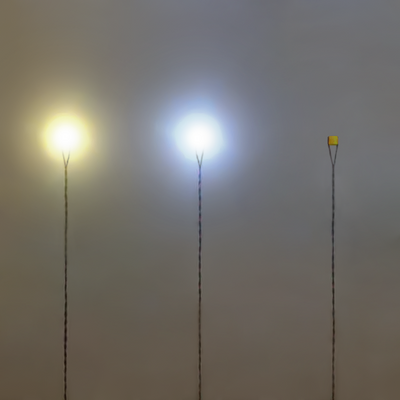
So this is like a remote control, touch sensor, photo sensor, timer, and this is a lighted switch. We have examples of those as well. Here are the switches I was talking about, so here is a lighted panel mount switch, this lights up when you turn on the light.
This is a 3-way slide switch, it is kind of a specialty switch, it goes red to red, but on one side you can light one color and if you flip it the other way, you can light another color. That’s when you use that type of switch.
This is our remote switch, so you’ll need a remote to activate it. Then we have touch sensors, this switch is a photo sensor so it only comes on in the dark. And this switch is a motion sensor, which just sensed motion, so it’ll stay on for 15 seconds and then go off.
Model LED Remote Control
View the benefits of a remote control for mini LED lights when you watch our mini LED remote control wiring demonstration video.Video Transcription
A remote control is a great way to control your projects. We have this remote, it’s a line of sight type of remote, which means it sends an infrared beam, the beam will trigger this remote. As long as this is showing in your project, you can turn your project on and off using the remote.
This remote comes with 2 short wires that go to the LEDs that you want to control, and 2 long wires that go to power. You can of course cut either set of wires to whatever length you want. Just keep track; the side with the receiver is also the side that goes to the lights.
In this case, I’ve attached the remote to a 9-volt battery, and as you can see I have a variety of lights that are on and I can turn them on and off with the remote. The remote also has dimmer settings so I can dim the lights.
The interesting thing about dimming the lights is that some of the lights behave differently, like flashing will become slower, and so will flickering and breathing, but the solid lights you can dim and brighten. There are four bright and dim settings and then there’s off.
One thing about the remote: it will continue to stay awake waiting for the next signal. So in that case, if you want to make sure to not drain your battery you’re going to want to use the switch to turn it off as well, that way there is no drain of the battery while the remote waits for a signal.
Really Small Slide Switch
Turn your projects on and off with this really small slide switch. This switch can be used when your project space is really at a premium.Capacitance Touch Sensor
This touch sensor is a great way to turn your LEDs on and off. Flat, compact, easy to add to your new or existing miniature projects.Video Transcription
This is our touch sensor, it comes pre-wired with long input wires that you would connect your battery to and then short output wires that go to your lights. It can run up to 15 lights. This can run on a battery pack which we sell, a AA or AAA battery pack, or it can run on a coin cell.
So what you’re going to do, if you decide to use a coin cell, is put the coin cell into the holder making sure to match the plus. Then you always want to protect your connection with shrink tube, so you put the shrink tube on first. You connect red to red and black to black, then you slip your shrink tube over the connection. You can wait to heat the shrink tube until you have everything all situated and make sure your lights are turning on as you want and then shrink the shrink tube.
So now I have my two input wires going into my battery. Now on the other side, I’m going to connect the light, I can connect up to 15 lights. Right here I have a mega warm LED light, putting the shrink tube first. These are the shorter wires that I’m connecting to now.
And you can of course cut these wires shorter, the only reason we did long and short is so you know which is which. I’m touching the touch sensor as I’m adding the shrink tube here.
Okay, now this metal part right here is the part you’re going to want to touch. So you would mount this on the outside of your project so that you could easily reach it. So now I’m going to touch it to turn on my light and touch it to turn off my light.
How to Use a Panel Mount Push Button Switch
This video will explain how to use a lighted panel mount push button switch to control your hobby model project.Video Transcription
This is our lighted panel mount switch. It’s called a panel mount switch because it is threaded, and it has a nut that you can put in from the top and then screw the switch into position in your project.
You’ll notice that this switch has two long wires and two short wires. You can of course cut the wires any length that you like, but we have the two long wires so that you’ll know which end goes to power and the two short wires go to your lights.
In this example, I’ve wired this panel mount so that the two short wires go to my light and the two long wires go to power. You can see when I turn on the panel mount switch, the light goes on and also the indicator light goes on.
How to Use a 3-Position Switch
Using a 3-position slide switch for LEDs is a great way to get more control over the lighting of your hobby model project!Video Transcription
A 3-way switch is a nice way to control more than one set of lights in your project. With this switch that we have, one wire goes to power and the output wire goes to 2 different things, so say 2 different sets of LEDs. The center position on this switch is off, then you have left and right.
In this example, we’ve wired 2 different sets of LEDs to the switch. So you can see there’s a red wire coming from power to the switch. The 2 output wires, one red wire goes to this set of LEDs and one red wire goes this set of LEDs. All the green wires or black wires from the LEDs go to the black from the battery.
Right now, this is in the off position, if I switch it this way, the orange LEDs light, if I switch it the other way, the blue LEDs light. So this way I can just go off-center, one color on one side and one color on the other side.
Battery Snap with Switch for LEDs
Use our easy 9-volt Battery snap with a separate on-off switch to run your LEDs. This sturdy little snap can run 50 LEDs nice and bright with your 9-volt battery.Video Transcription
This is our 9-volt battery snap switch. It has a white switch that’s a locking switch that turns the lights on and off. We call it snap because it snaps onto a 9-volt battery. It’s an easy way to run your 9-volt lights.
Sometimes people ask us how many lights I can attach to a 9-volt battery. In our test, we ran 50 lights on this 9-volt battery snap and they lasted about 4 and a half hours. You can also mix sizes on here, on this battery snap you can mix sizes and you can also mix solid and flashing LED lights.
The flash doesn’t carry over and cause your solids to also flash. When you go to connect the lights to the battery snap, you’re going to want to connect the red wire from the lights to the red wire on the battery snap, and the black wire from the lights to the black wire on the battery snap. Then you can easily turn your lights on and off.
How to Wire a Model LED Photo Sensor
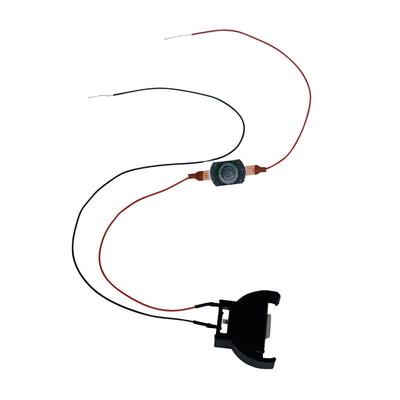
A photo sensor is a great switch to have as they turn off automatically when it's dark and back on when it's light.Video Transcription
This is our photo sensor, it is a nice way to turn your lights on when it’s dark out. What we’ve done is added 2 short wires to the side that goes to your lights, and 2 longer wires that go to power. The sensor is just this little piece in the middle here.
As long as you have that sensor showing, you can have it trigger the on and off of your lights. The sensor works with a 9-volt battery or 12-volt power, and here’s an example of it turning on the light. As long as it’s dark where the sensor is, your light will come on, and it goes off when there’s enough ambient light. It also works with 3-volt power so coin cell or in this case AAA.
One thing to remember, you don’t want this light shining at the photo sensor because when it gets dark enough the light comes on and the photo sensor will go back off.